DIGITAL RESOURCES
4-step mini-lesson template

View the 4-step process in 4 sample mini-lessons

Grade 3 | Round 2, Day 1 | Character impacts the plot


Grade 4 | Round 2, Day 3 | Character impacts the plot


Grade 5 | Round 2, Day 1 | Combine pre-selected details to generate a synthesis
(Mini-Lesson Resources)
STEP 1:
Introduction
STEP 2A:
Instruction: I tell
STEP 2B:
Instruction: I do
STEP 3:
Interaction
Step 4:
Closure

STEP 1:
Introduction
STEP 2:
Instruction
STEP 3:
Interaction
STEP 4:
Closure

Grade 1 | Round 3, Day 5 | Retell the most important in order
STEP 1:
Introduction
STEP 2:
Instruction
STEP 3:
Interaction
STEP 4:
Closure

Steps 1 and 2A:
Introduce & Instruct
Step 2B:
I do; You watch & listen.
Step 3:
I do again; You help.
Step 4:
Close
Master the 4-step mini-lesson
Effective mini-lessons last about 15 minutes, follow a 4-step rhythm, and progress through the I-do, We-do, You-do gradual-release model. Whether you’re teaching reading or writing, this same lesson pattern is the gold standard for keeping students engaged during whole-class instruction.
Step 1 – Tell the students what skill they are about to learn.
During the introduction, let students know what skill you plan to teach. Remember to keep the focus narrow. After all, you only have 15 minutes for this lesson, making it essential that the focus is on one small, granular skill.
With a reading comprehension mini-lesson, for example, you wouldn’t teach a single lesson on “how to summarize informational text.” Mini-lessons target a mini-skill focus. Consequently, first teach “how to identify the most important details – versus less important details.” Then, in a second mini-lesson, teach how to summarize individual sections of a longer text. A third lesson in the series might reveal how section summaries are stacked and sequenced to match the original text’s structure.
By focusing on a more granular objective per lesson, we scaffold student understanding in bite-sized chunks.
Step 2 – Provide direct and explicit instruction.
The second step of the mini-lesson actually contains two parts – Step 2A and Step 2B.
During Step 2A, spend about five minutes defining the skill, explaining why it’s important, and describing how it works.
In Step 2B, the focus shifts to a demonstration. Here, you will spend about five minutes executing the skill live in front of the students. During this model, engage in a Think Aloud as you demonstrate how to wrestle with and ultimately apply the skill.
In all of Step 2, the teacher is in control and doesn’t share the stage with students. This is the I do, meaning that you are delivering “edutaining” instruction while students watch and listen.
Step 3 – Engage the entire class as they apply the skill with teacher support.
After students have heard an explanation of the skill and the teacher has demonstrated it in action using a Think Aloud, it’s time to invite kids to experience it as a group.
In the I-do, We-do, You-do gradual-release model, Step 3 is the We-do. During this part of the lesson, the whole class works together to attempt the same, single skill.
After explaining and demonstrating the skill in Step 2, utilize different examples during Step 3. For instance, in a reading comprehension lesson, use a different excerpt from the same text that you used in Step 2. With the new selection, work through the thinking like you did in Step 2, but interject Turn and Talk opportunities throughout the process. This gets kids engaged in applying the skill.
During Step 3, plan for 2-3 We-do opportunities so that students begin to see how the skill can be applied universally.
Step 4 – Close the lesson and describe the You-do task that follows.
Now it’s time to transition to a You-do experience.
But, keep in mind, this isn’t when you assign homework. It’s not realistic to expect that students can apply a skill independently when they just learned it moments earlier.
Instead, provide opportunities for students to work in small groups with you, the teacher, nearby, providing a lot of support. Eventually, release them to work in pairs and then independent practice. This gradual rollout provides students the scaffold of ongoing support that they need to be successful with the skill.
Remember, the students don’t get better during the lesson—it’s after the lesson when they practice the skill that they improve their abilities. Consequently, keep the lesson short. Keep it mini.
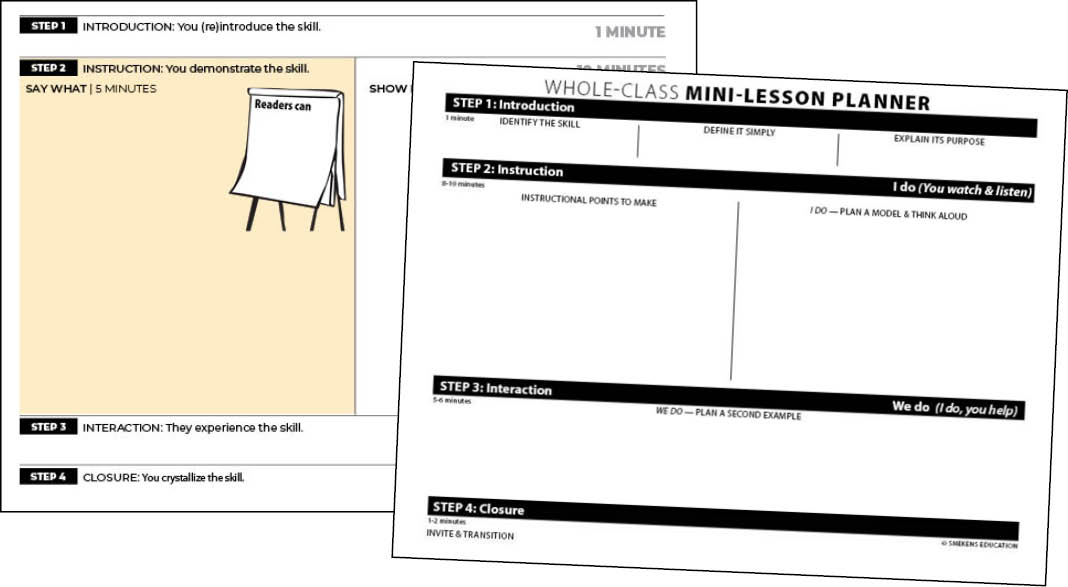
If you are ready to plan your whole-class mini-lessons utilizing these four steps, be sure to check out our “Whole-class mini-lesson planner.” This document is available as a PDF or a Google document and provides a framework for planning and delivering the 4-step mini-lesson architecture.